| Back to Back Issues Page |
 |
|
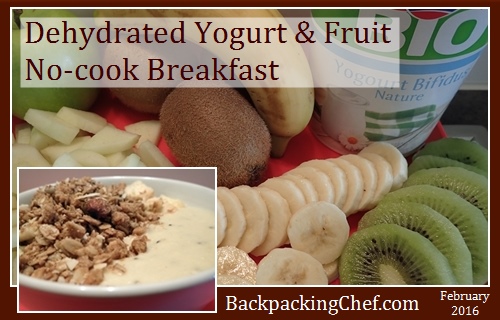
February 2016 Trail Bytes: Dehydrating Yogurt for East No-Cook Backpacking Breakfast February 26, 2016 |
| Hello, For this issue of Trail Bytes, I dehydrated yogurt and fruit puree. While I thought the results were good at first, Dominique and I ultimately decided, after taking dried yogurt on a few backpacking trips, that we would not include it in future backpacking menus. As you read the details of this experiment, you’ll see that dried yogurt does not rehydrate easily. The higher the yogurt content in the fruit/yogurt mix, the harder it is to get those bits of dried yogurt to absorb water. This even applies if you grind the dried yogurt into powder. The best solution was to rehydrate the yogurt by kneading it in a Ziploc bag, which I called the squeeze bag method. One thing that we discovered when reconstituting dried yogurt on a few backpacking trips was that the flavor became acidic – basically a concentrated sour taste that we didn’t enjoy. Dairy spoilage may have occurred during dehydration, but even if it was safe to eat, it simply didn’t taste good. What follows is the experiment as originally reported, in case you want to play around with it. Feel free to let me know what results you have gotten from dehydrating yogurt. Contact form.
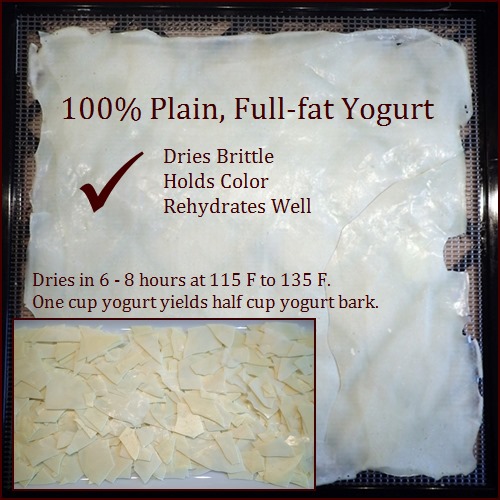
Initial Yogurt Dehydrating Experiment:Since this was my first time dehydrating yogurt, I dried it by itself to see how it behaved in the dehydrator. I spread one cup of full-fat yogurt on one Excalibur Dehydrator tray covered with a non-stick sheet and dried it at 135° F for six hours. After four hours, I flipped it over onto a tray without a non-stick sheet to dry it completely.
The yogurt dried brittle, like bark, not leather. It held its color well. One cup of yogurt yielded ½ cup of bark. It tasted just like yogurt – no change in flavor from the yogurt dried. Tip: Spread yogurt thinly on dehydrator trays. It will dry faster and will be easier to reconstitute in your no-cook backpacking breakfast. I wouldn't pack plain yogurt bark for trail snacks. It is too brittle and needs a fruit companion which was the next experiment.
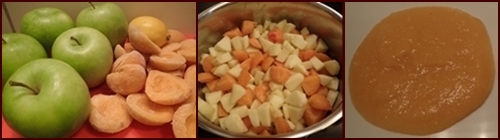
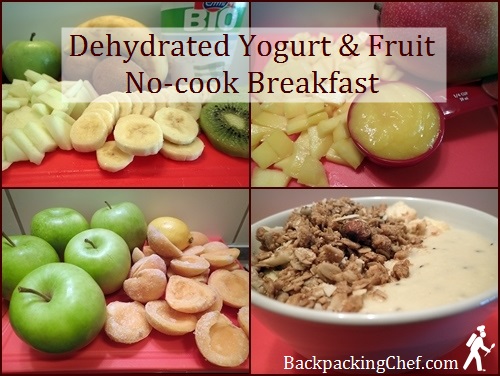
How to Make Fruit Puree & Yogurt Bark with Fruit PiecesStep One: Dehydrate fruit pieces.Cut and dehydrate pieces of complimentary fruits to add to your no-cook breakfast on the trail. If you cook fruit, as in the apple/apricot example below, you can set aside a portion of the cooked fruit to dry whole before you blend the rest. Alternatively, you can cut and dry raw fruit.
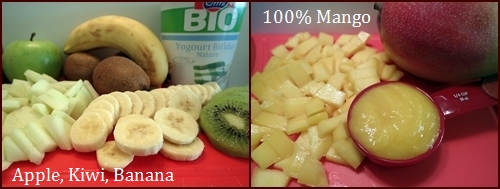
I made three fruit purees, but the possibilities are endless. I plan to use other fruits like pineapple and berries in the future. Puree One: Five Granny Smith apples, ten apricots (I used frozen, twenty halves), grated lemon peel plus the juice from half a lemon, and one Tbsp. of sugar because the mix was a little tart. I cooked it with no extra water for about twenty minutes, let it cool, and ran it through the blender. Before blending, I set aside one cup of the cooked fruit to dry separately. Puree Two: Six kiwis, three apples, one banana, ½ lemon juice and gratings, and 2 Tbsp. sugar. I cooked this for twenty minutes and then pureed. The next time I try this mix, I will blend the kiwi in uncooked because it lost its nice green color when I cooked it. Puree Three: One mango, raw. I cut the mango in half long ways and blended half of the mango into puree. I cut the other half into small pieces to dry separately. The yield from one mango was ½ cup dried mango pieces and ½ cup mango puree which I mixed with yogurt.
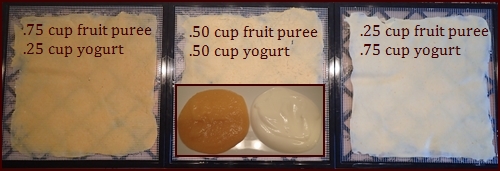
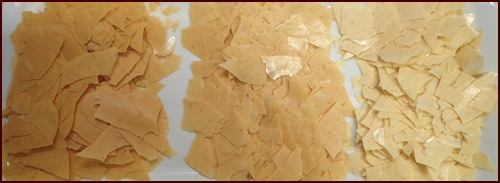
The fruit puree and yogurt combine easily by hand. I experimented with three different ratios of fruit puree to yogurt:
I dried one cup total per Excalibur Dehydrator tray at 135° F for eight hours. With the addition of the fruit puree, the mix took longer to dehydrate than yogurt by itself. I flipped the sheets over after six hours and finished drying directly on the mesh sheets. Your drying time could vary. If you dry the mix at 115° F, it will take a little longer. Tip: Spread mixture thinly on dehydrator trays so that it dries fast. Thinner yogurt bark will be easier to reconstitute. If you are using a dehydrator with smaller tray capacity like the Nesco brand, use less than one cup of puree per tray. See my food dehydrator page for a comparison of dehydrator tray capacities.
Most Versatile: The 50/50 fruit puree and yogurt blend would be great for snacking on as leather or reconstituting back into yogurt if you want more fruit flavor. (photo above, middle) Best for Leather: The blend with 75% fruit puree and 25% yogurt was the most pliable, like leather, and would be great for snacking on without rehydrating. (photo above, left) No-cook Backpacking Breakfast
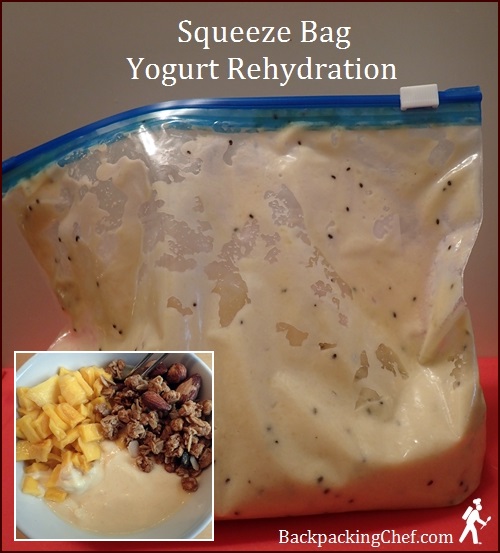
Squeeze Bag Yogurt Rehydration:
Photo above shows apple/kiwi/banana/yogurt bark reconstituted in bag. Inset shows mango blend with added mango pieces and granola. Use a plastic bag with a good zipper closure to reconstitute the yogurt bark. This method works well because you can work the mixture better with your fingers than you could with just a spoon. For one large serving, add one cup of dried yogurt bark to bag with one cup of cold water. Squeeze the bag until the yogurt is smooth, about ten minutes. Add more water as needed to bring it to your preferred consistency. The reconstituted equivalent of one cup of yogurt bark is two cups. Add Extra Fruit & Granola:Reconstitute ½ cup of dried fruit pieces with ½ cup cold water separately. It takes about ten minutes for the dried fruit to soak up enough water to make it soft, yet still chewy. Start reconstituting the fruit before you reconstitute the yogurt bark so it all comes together at the same time. The water you reconstitute the dried fruit pieces with will have a fruity flavor. Stir any surplus fruity water into the yogurt.Eat your no-cook trail breakfast right out of the bag or transfer it to a serving bowl. Clean-up is easy: Turn the bag inside out and lick it clean!
How Long Will Dehydrated Yogurt Keep?I was initially skeptical about dehydrating a dairy product like yogurt because of the fat. But, after studying the fat content of yogurt compared to other foods, I found that it has less fat than I assumed and less fat than other foods.
Since this was my first experiment dehydrating yogurt, I can’t say with certainty how long it will keep based on first-hand experience. However, to check that it would not spoil short term, I let some of the yogurt dried in this experiment sit out for a week (unrefrigerated and without vacuum sealing), and it was fine. Considering that I have stored vacuum sealed, lean ground beef for a year, which has a higher fat content than yogurt, I anticipate that the storage life of dried yogurt will be at least a year. I will set aside a couple of vacuum sealed jars to test how it holds up in long term storage. Note: A potential problem with dehydrating yogurt is not so much the fat content, but that the dairy solids may sour while you’re drying the yogurt. This will be less noticable if you blend the yogurt with fruit puree. As with all dehydrated foods, the key to successful long term storage is to dry the food completely in the first place and then store the food in an oxygen and moisture free environment. I use vacuum sealed bags for the trail and vacuum sealed jars at home. Read my vacuum sealer and wide-mouth jar sealer review. Dominique enthusiastically approved the dried yogurt that I made this month, so we will add this no-cook meal to our breakfast menu for our spring Appalachian Trail hike. We’re heading back to Shenandoah National Park in Virginia. In the next newsletter, I’ll share the complete menu and dehydrating activities. Until then… Happy Hiking, Chef Glenn & Dominique P.S. If you have any questions or comments about this issue of Trail Bytes, please reply to this email or use the contact form at BackpackingChef.com. The topic of dehydrating yogurt is not included in the new Recipes for Adventure II: The Best of Trail Bytes, but you will find several other backpacking breakfast recipes like omelet bites and pancake bites. 

If you received this newsletter from a friend and would like to subscribe (it's free), subscribe here. Visit my BackpackingChef Facebook page for the lastest posts. Be sure to "follow" the page to continue seeing posts. |
| Back to Back Issues Page |