| Back to Back Issues Page |
 |
|
March 2018 Trail Bytes: Perfect macaroni that's not too hard, not too soft. March 14, 2018 |
| Hello, Macaroni in the backcountry sometimes turns out too hard, too soft, or just right. In this month’s edition of Trail Bytes, I experiment with several cooking methods to make perfect macaroni that will please the pickiest Goldilocks among us. In Recipes for Adventure, I use macaroni straight from a box of mac and cheese in several recipes. The meals are cooked in a pot, and as long as a boil is maintained for two minutes, followed by insulating the pot in a cozy for ten minutes, the macaroni turns out just right. It helps that the macaroni from boxed mac and cheese is fairly thin, so it cooks quickly. However, if a person wants to cook a macaroni meal freezer-bag-style, by adding boiled water to the ingredients in the bag, the heat retained is not sufficient to cook the macaroni, and it turns out too hard. 3 Reasons to Precook & Dehydrate Macaroni
Cooking & Dehydrating Macaroni at HomeFor each cup of macaroni (approx. 100 grams) to be cooked, add one teaspoon of salt to a quart or liter of water and bring it to a rapid boil. Add the macaroni and reduce heat to maintain a gentle boil.You want to slightly undercook the macaroni. If the instructions on the box say to boil the macaroni for eight to twelve minutes, strain off the water at seven minutes. Immediately rinse the macaroni two times in cold water. That stops the cooking and ensures that the macaroni will not stick together on the dehydrator tray. Spread the cooked macaroni out on dehydrator trays in one layer. There is no need to use a non-stick sheet, as that would only slow down dehydration. Set the dehydrator thermostat at 135° F and the macaroni should be dry in about four hours. If you are drying with an Excalibur Dehydrator, one tray will hold 1¼ cups (150 grams) of macaroni. (Precooked measurement)
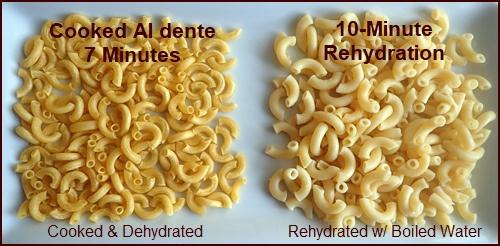 The photo above shows what a ½ cup of cooked and dried macaroni (47 grams) looks like after being rehydrated with a ¼ cup (59 ml) of boiled water in a thermos for ten minutes. The texture was perfect al dente. I was surprised how little water was required to bring the macaroni back to its original condition.
How Much Water Should Be Used to Rehydrate Macaroni?Before we get started, please know that I take care of all these experiments and calculations before I publish new recipes on the website or in cookbooks. Recipes will say exactly how much water to add.But, for newsletter readers, I often explain the techniques used to develop recipes, so that you can follow the process when creating your own backpacking recipes. Let’s get started… One Excalibur Dehydrator tray will hold a volume of 1½ cups of cooked macaroni. That quantity divides neatly into three ½-cup portions or two ¾-cup portions. Those are macaroni portions I typically use in recipes. Using the food scale’s gram setting, weigh the cooked macaroni before you place it on the dehydrator tray. Weigh the macaroni from the tray again after you dry it. The difference in weight is how much water weight was lost in grams. Since one milliliter of water weighs one gram, you now know how many milliliters of water are needed to rehydrate the dried macaroni back to its original cooked condition. Here’s the math: One tray of 1½ cups cooked macaroni weighed 316 grams. After dehydration, it weighed 139 grams. 316 grams – 139 grams = 177 grams of water weight lost Since I wanted to work with a ½ cup portion (one third of the total tray), I divided both the dried weight and the water lost by three. 139 grams of dried macaroni divided by 3 = 47 grams. (Fills ½ cup) 177 grams of water weight lost divided by 3 = 59 grams, or 59 milliliters of water required to rehydrate. Conveniently, 59 milliliters is equivalent to two fluid ounces, or a ¼ cup. Now knowing the precise amount of boiled water needed to rehydrate precooked and dried macaroni, my next two experiments combined macaroni with chili in a thermos food jar. “This macaroni is too soft,” said Goldilocks.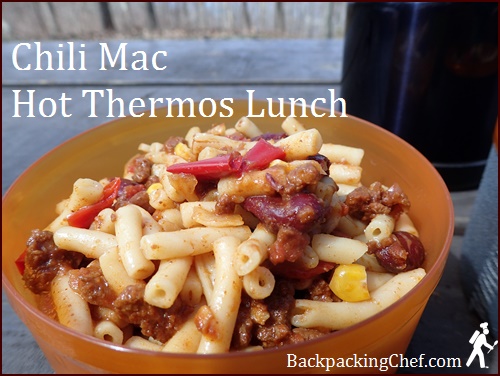 The photo above shows a hot lunch serving of chili mac that I prepared for Dominique and myself in Shenandoah National Park. The macaroni, after sitting in the thermos for four hours, was too soft, which is the main reason I undertook this month’s macaroni experiments.
I wanted to see if shortening the amount of time that the macaroni was in the thermos would improve results.
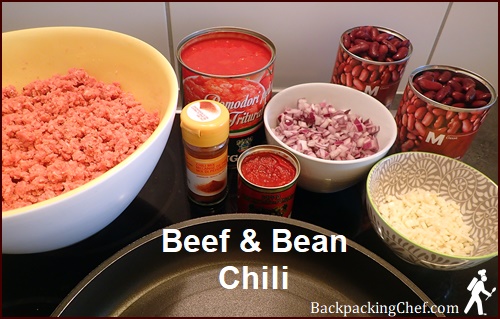 The Beef & Bean Chili recipe is on the website.
For both experiments, I used a ½ cup (47 grams) of dried macaroni and one cup (75 grams) of chili. After the first macaroni experiment, I knew that two ounces (59 ml) of water was required to rehydrate a ½ cup of macaroni. Using the same before/after weighing technique for the chili, I determined that 176 milliliters of water was required to rehydrate one cup (75 grams) of dried chili. The total amount of water needed to rehydrate the chili and macaroni together was 235 milliliters, which I rounded up slightly to its equivalent eight ounces.
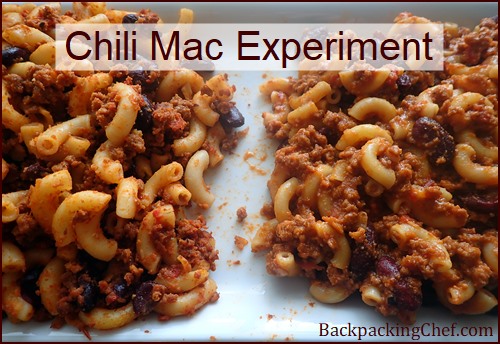 In the photo above, Experiment # 1 (too soft) on left, Experiment # 2 (just right) on right.
Experiment # 1Add eight ounces of boiled water to chili and macaroni in thermos food jar. Wait three hours.Result: Tasty, but macaroni was too soft. Experiment # 2Add eight ounces of boiled water to chili in thermos food jar. Hold back the mac. After three hours, quickly stir in the macaroni and screw the lid back on the thermos.Result: I checked the status of the macaroni at ten minutes, and it was not sufficiently rehydrated. Same at fifteen minutes. At twenty minutes, the macaroni was mostly rehydrated, but at thirty minutes it was Goldilocks perfect. The meal was still hot. Conclusion: To enjoy a hot thermos lunch with perfect macaroni, prepared in advance, add all the boiled water required for the recipe in the morning, but wait to add the macaroni until thirty minutes before you eat. I carry my thermos food jar in a side pocket of my backpack, so it will be easy to add the macaroni when I start to get hungry for lunch.
“This macaroni is too hot,” said Goldilocks.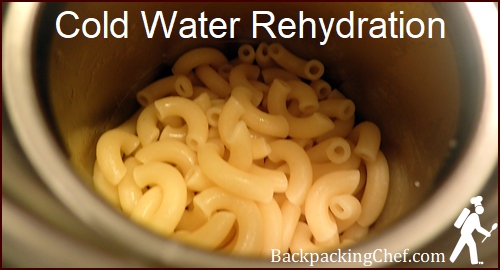 As long as I was rolling with macaroni, it seemed a good time to experiment with cold water rehydration. I wrote about cold water rehydration of couscous, vegetables, and legumes in the
August Trail Bytes.
As long as I was rolling with macaroni, it seemed a good time to experiment with cold water rehydration. I wrote about cold water rehydration of couscous, vegetables, and legumes in the
August Trail Bytes.
Cold Water Rehydration ExperimentThe same macaroni and water quantities as demonstrated above were used. (47 grams macaroni and 59 ml water, or translated into cups, ½ cup macaroni and ¼ cup water).After combining the macaroni and water in the thermos, I checked the consistency at intervals. At fifteen minutes, not ready. At thirty minutes, not ready. At one hour, improved, but not 100% ready. At two hours, perfect. Goldilocks approves. This opens up many possibilities for no-cook macaroni salads on hot summer trail days. Add cold water, macaroni, and dried vegetables to the thermos two to three hours before lunchtime. Stir in other items when serving, like dressings and packets of tuna or chicken. I hope you enjoyed this exploration of macaroni, and that it adds to your dining pleasure on the trail. I’m looking forward to receiving your macaroni salad ideas and any comments or suggestions you have about the newsletter. See you next month! Freundliche Grüsse,
Chef Glenn & Dominique P.S. This macaroni drying project, plus several recipes that use macaroni are included in Recipes for Adventure II: The Best of Trail Bytes. 

If you received this newsletter from a friend and would like to subscribe (it's free), subscribe here. Visit my BackpackingChef Facebook page for the lastest posts. Be sure to "follow" the page to continue seeing posts. 
|
| Back to Back Issues Page |