Backpacking Stoves
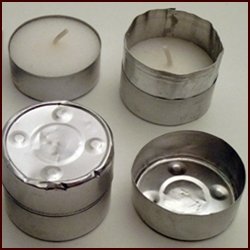
I often cook with two backpacking stoves at the same time. The stove on the left below is an aluminum tealight candle cup which I fill with alcohol to cook the main meal. The stove on the right is three tea light candles which I use to heat a side of vegetables or a hot dessert.
I support the pot and fry pan lid with pot stands cut out of ½ inch hardware cloth. Hardware cloth is strong enough to support a pot – but weighs next to nothing.
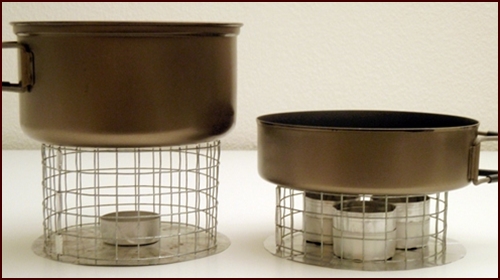
Alcohol and candle stoves shown without windscreen
How to Make Pot Stands for Backpacking Stoves
Tools & Supplies Needed:
- Wire Cutters
- Coarse Sand Paper or Metal File to smooth wire ends
- Scissors
- ½ Inch Hardware Cloth (Sold in hardware stores)
- Foil Tape (Sold in hardware stores)
- Aluminum Windscreen Material (resource at bottom of page)
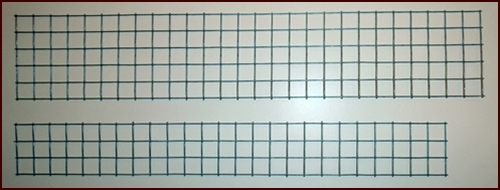
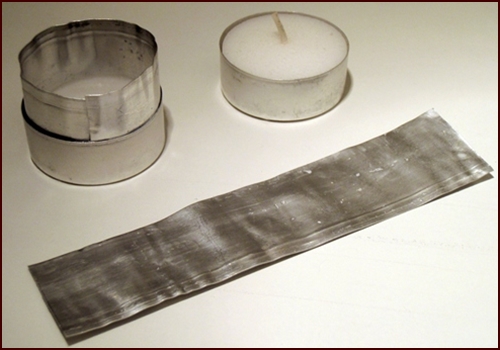
½-inch hardware cloth cut for tealight alcohol stove and candle stove.
Cut the hardware cloth to the desired height and length for your pots. Cutting five squares by twenty-seven squares works well for the tea light alcohol stove and cutting three squares by twenty-five squares works well for the candle stove. Three squares keeps the pot close enough to the candles for good heat transfer but high enough above the candles to prevent soot from forming on the bottom of the pot. Cutting the length of the pot support for the candle stove two squares shorter than the other allows it to nest inside the other pot support when packed. I use these size pot stands for both my 900 ml and 1.3 liter Evernew pots with fry-pan lids.
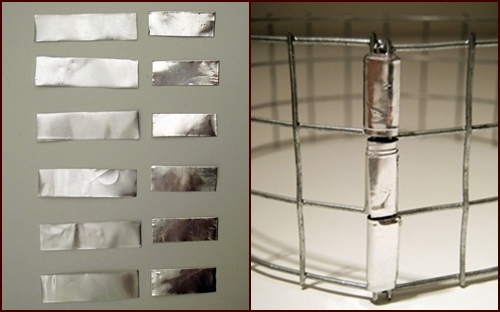
Aluminum strips and foil tape wrapped tightly around the ends makes a strong hinge.
Bend the hardware cloth into a circle and fasten the ends together by wrapping 1 inch by 3/8 inch strips of aluminum windscreen material around the corresponding wires. Wrap the aluminum tightly around both wires four times. The eraser end of a pencil is useful for pushing the aluminum strips through the squares. If you buy a section of aluminum windscreen material from the resource listed at the bottom of the page, you will have extra to use for these hinges. You could also cut the aluminum strips out of an aluminum pie pan.
Cut slightly smaller strips of foil tape, remove the backing, and wrap around the aluminum hinges two times. Now you have flexible but strong joints holding your pot supports together.
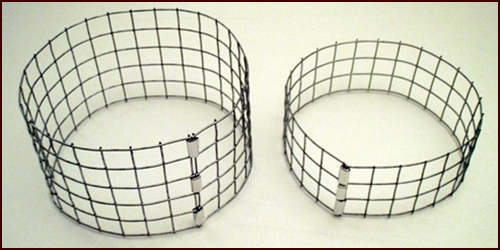
Finished pot stands for my alcohol and candle backpacking stoves.
Windscreens
To protect the wicks while packed and to provide additional wind protection for the candle flames, I insert three mini windscreens into the tealight candle cups.
Mini-windscreen and wick protector.
Cut three 1 inch by 4½ inch strips of aluminum windscreen material. Tealight cups are approximately ½ deep, so ½ an inch of the aluminum strips will extend above the cup. Reuse the strips when changing to new candles.
 |
Before packing the candles in your pot, slide empty tealight cups over the open ends to protect the wicks as shown in the photo at left. |
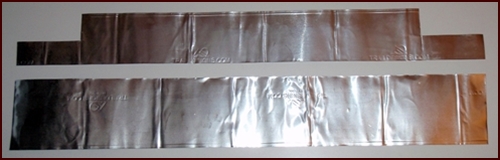
Windscreens cut for alcohol and candle backpacking stoves from 6 inch by 28 inch material.
I cut my windscreens so they work for both my 900 ml pot and my 1.3 liter pot.
Windscreen size for alcohol backpacking stove: 3¼ inches by 22 inches.
Windscreen size for candle stove: 2½ inches by 22 inches. Cut out a section 3 inches by 1¼ inches from each end to make room for the fry pan handle.
Since my pots have fry pan lids, I have a little extra space above the pot for packing a wider windscreen for the main pot. If your pot has a standard lid you could use a slightly narrower windscreen or wrap it around a fuel bottle. I pack my windscreens inside the pot because I stow my fuel bottle in an outside mesh pocket of my backpack and don’t want to risk cutting the mesh.
Cutting the windscreens 22 inches long allowed enough overlap to close the windscreens with paper clips. Shoot for at least two inches of overlap. The length needed may be different for your pots.
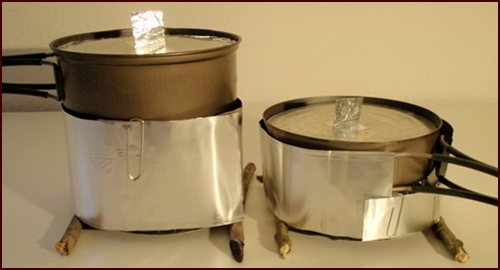
Backpacking stoves set-up shown with windscreens and homemade lids.
Leave a gap ¼ to ½ inch between the windscreens and the pot when in use. If you wrap the windscreen around the pot too tightly, it will be difficult to lift the pot off the stove without the windscreen coming with it. The heat rising through the gap creates a chimney effect, pulling in fresh air from the bottom. I either lay two half-inch thick sticks along the sides of the pot stand to raise the windscreen as shown in the photo above or I use three large paper clips attached to the bottom of the windscreen to raise it up a little. I prefer using the paper clips.
Heat Shields
Cut two round heat shields out of aluminum pie pans to place under the backpacking stoves. The heat shields stow at the bottom of the pot when packed. The primary purpose of the heat shields is to catch any spilled fuel. A few drops of alcohol spilled on the heat shield will burn off quickly and not cause any problem.
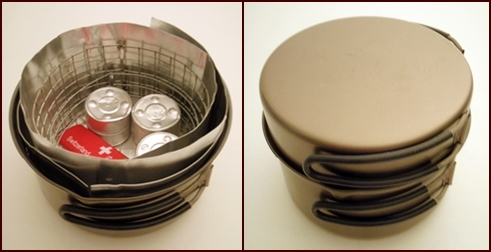
900 ml Evernew Pot with fry pan lid packed with all backpacking stove components.
The packed pot stands keep a center cavity open inside the pot to store up to nine candles with lids plus other items such as a lighter, matches and spoon.
Backpacking Stove Components:
2 heat shields, 2 pot supports, 2 windscreens, 2 homemade lids, 3 tealight candles with mini windscreens and lids, 1 empty tealight candle cup.
Weight: 134 grams or 4.7 ounces.
Tealight candles weigh between 13 and 14 grams each before you start to burn them.
Weight does not include alcohol. A tea light cup holds approximately ½-ounce of alcohol which weighs 14 grams.
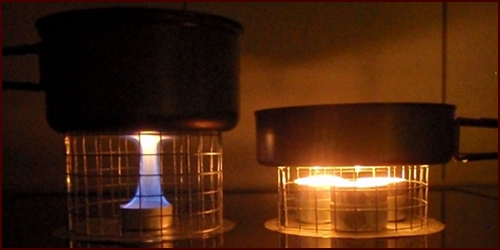
Tealight alcohol and candle backpacking stoves in use without windscreens.
Tealight Cup Alcohol Stove Fuel Efficiency
Tealight cups hold approximately half an ounce of alcohol. I fill the cup about three-quarters full with alcohol (third of an ounce) to heat meals requiring one to one and a half cups of water. I fill the cup all the way to the top (half ounce) when using two cups of water or when cooking macaroni because it needs at least two minutes of boiling. Using a third of an ounce of alcohol per meal gives me a range of six days with an eight-ounce (volume) bottle of alcohol assuming I cook three times per day. I only need a couple ounces of fuel if I am going backpacking for a weekend.
When cooking a meal for two people with three cups of water, fill the tealight cup again after the first cup-full burns out, although you may not need to fill it all the way the second time. Be sure to wait a minute for the cup to cool before refilling.
I have cooked hundreds of meals with my tealight alcohol stove. Occasionally, a little more than a tealight cup full of alcohol may be needed to bring the water to a boil such as on very cold nights. One tealight cup holding half an ounce of alcohol will just barely bring two cups of water to a boil and sometimes it doesn’t quite make it. A little more alcohol finishes the job.
Tip: You can decrease the amount of alcohol needed to cook your main meal by preheating it for ten minutes with candles.
Tip: If you arrive at camp with leftover drinking water, use that to rehydrate your food. The warmer temperature of the water will require less fuel to heat than cold water from a spring or stream.
Acceptable fuels to use in a tea light cup alcohol stove are denatured alcohol (preferred) from a hardware/paint store, HEET® (Methanol) in the yellow bottle from a gas/convenience store, or pure grain alcohol (expensive) from a liquor store. Many hostels and small stores along the Appalachian Trail have denatured alcohol available by the ounce for hikers. Rubbing alcohol (Isopropyl) is not recommended because it has water in it and burns poorly.
Denatured alcohol may vary slightly in composition in other countries. The Brennsprit I used in Switzerland burned with more yellow in the flame compared to the U.S. brands which burn hotter with more blue in the flame. The Brennsprit left some soot on the bottom of my pot whereas this never happens with the U.S. denatured alcohol.
Here are some names of fuels similar in composition to denatured alcohol in other countries:
- France – Alcool a’ bruler
- Germany/Switzerland – Brennsprit
- Italy – Alcool Etilico Denaturato
- Australia – Methylated Spirits
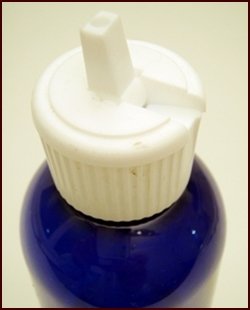
Tip: Carry your alcohol in a plastic squirt bottle so you can fill your aluminum tealight cup with precision and avoid excessive spills.
WARNING: Alcohol flames are invisible during the day. Do not refill a backpacking stove until it has cooled. Do not use a stove inside a tent or inside any unventilated space as harmful gases will accumulate or entrapment during a fire could occur. All backpacking stoves may cause burns or fires if used improperly. Do not leave your stove unattended.
Candle Stove Fuel Efficiency
Tea light candles vary in quality. Test the efficiency of the candles you buy before hitting the trail. You can expect to get from twelve to twenty ten-minute burns from a set of three candles. A single serving of vegetables rehydrated with ½-cup of water is hot after ten minutes. Two servings rehydrated with one cup of water are hot after fifteen minutes.
How fast will these backpacking stoves boil water?
Most backpacking stoves such as the Pocket Rocket® and Jet Boil® will boil a cup or two of water in three to five minutes. The tealight alcohol stove takes about six minutes to boil water for one meal. Taking a bit longer is a good thing when heating dehydrated foods since the food needs twenty to twenty-five minutes to rehydrate. There is no need to rush the boil. The candle stove heats, but does not boil.
How to Cook Dehydrated Meals with a Tealight Cup Alcohol Backpacking Stove:
Soak the food in the pot for five minutes and then light the stove. Ignite the alcohol in the tealight cup with a wooden stick match with the pot, pot support, and windscreen already in place. After striking, hold the match by the end and stick it through the pot support at the bottom. The fuel should ignite as soon as the lit match reaches the cup. I also carry a lighter because the match striker sometimes gets moist and the matches won’t ignite. In that case I use the lighter to ignite the match.
The tealight cup alcohol stove will bring a single-serving meal to a boil in about six minutes. After the alcohol burns out in seven or eight minutes, wait another ten to fifteen minutes for the food to fully rehydrate. Keep a lid on the pot to hold the heat. You can also use a pot cozy to insulate your pot.
How to Heat Dehydrated Vegetables & Fruits with Three Tealight Candles:
Soak the vegetables or fruits in your pot or fry pan lid for ten minutes and then light the candles for ten minutes. This way the vegetables and main meal are hot and ready to eat at the same time. I heat and rehydrate vegetables and fruits with an equal quantity of water. For one serving, combine a half-cup of dried vegetables or fruits with a half-cup of water. It takes five minutes longer to heat one cup of water for two servings. Keep a lid on the pot while heating.
Tip: Steam cook vegetables such as corn, mixed vegetables, peas, and green beans for ten minutes at home before dehydrating them. By precooking at home, the vegetables only need to be rehydrated and heated – not boiled – on the trail.
Explore More...
You can make the two windscreens described above by cutting from one 6 inch by 28 inch section. Anti-Gravity Gear sell windscreen material in 4", 6", or 8" widths by 28" long.
Windscreen Material: Purchase from Anti-Gravity Gear.
Tealight Candles: Purchase from Amazon, Richland
Unscented Tealight Candles, Set of 125.
DIY Pot Cozy:
Keep your meals hot and save fuel.
How to Make a Pot Cozy.
Questions or Comments About Chef Glenn's Backpacking Stoves
If you have any questions or comments about my backpacking stoves, please contact me through my contact form.
PasnThru:
While I was goofing around comparing your alcohol stove to my "penny alcohol stove" I stumbled across a neat trick. If you take the windscreen out of one of your tealight candles and put it in the tealight alcohol stove, the stove will burn twice as hot for half as long. The stove will now boil a cup of water in three minutes instead of six minutes. So the stove is now dual heat. Burn it as usual to slowly cook and rehydrate a meal, or add the aluminum "wick" to make a quick cup of coffee or tea.
Chef Glenn:
I hadn’t thought of that! There is no end to the fun we can have with fire. Just be careful folks.
Kelly:
How many meals can you cook with three tealight candles? I love the idea of children cooking the veggies with the tealights. I'm just trying to figure out how many to pack for an eighteen day trip.
Chef Glenn:
Your typical tealight candle from a discount or grocery store will give you twelve to fifteen ten-minute burns which is about the time it takes to heat 1/2 cup water for a 1/2 cup serving of dehydrated veggies. However, you can find tealight candles that list a four-hour burn, so those could give you 20 to 24 ten-minute burns.
Since you said children, as in plural, I would guess that you will be cooking two half-cup servings (one cup of water to rehydrate) One cup of water takes fifteen minutes to get hot so you will be in the range of eight to ten fifteen-minute burns for the regular tealight candles and fourteen to sixteen for the four-hour candles.
To plan the number of candles needed for your trip, determine how many sides of veggies or fruits you plan to cook this way, multiply by fifteen if doing one-cup servings, divide that number by the estimated total burn time (in minutes) of the candles you are using, and multiply that by three since you always use three candles.
I have found that heating more than one cup of water with candles takes a little too long to be reasonable, but heating 1/2 and 1 cup works great. I recommend testing the candles you buy... lighting them for fifteen minutes, letting them cool, and relighting to see how many burns you get.
Tealight candles are not very heavy. I usually pack six for a week on the trail and then pack resupplies in my mail drops.

Share this page with friends on social media.


Free E-book & Newsletter

Free with Trail Bytes subscription.
Dehydrating Food from A–Z
